Other Inkcicle Pages

Monday, April 7, 2014

Digi Design Cards

Hello!  I made these easy card creations with digi designs from the Doodle Pantry.  They are having an "It's My Birthday Month" super sale and I picked up many-many-many fun sets.  I was so inspired by all my new goodies that in less than twenty-four hours I put together these two cards.  Both are for my sweetie.  I like to send him cards while I am traveling or surprise him with one when he needs some encouragement.   Either way these will do.

Old Watch ~ Doodle Pantry LLC

Here I challenged myself to only use Doodle Pantry designs and plain cardstocks.  Everything came together rather quickly.   It was so satisfying to get these put together. 
 
Pug Hugs & Kissy Lips ~ Doodle Pantry LLC

So what do you think?  Do you use digi's?

SMILES,
~Nancy

LINKS:
Doodle Pantry LLC
&
Doodle Pantry LLC Specials
Doodle Pantry Digital Challenge 45


Wednesday, March 26, 2014

Embroidery Pattern Peacock Card

Peacock Embroidery Card

Yes indeed!  I used an embroidery pattern as the main image for this card.  The image was too inspiring to resist not turning it into a card.  I feel so peaceful when I'm in the "coloring zone".  It was a tad of a challenge to get started with so many colors to choose from.  Once I got started each layer of ink blended so well.  I had to stop myself from adding too much.  For dimension and bling I added Stickles and Glossy Accents.  It really helped to pop out the peacock's flowing tail. 

Supplies

To balance the bright image I also used lots of dimensional embellishments.  Here I layerd fluffy flowers with ribbon swirls and pearl sprays.  The ribbon boarder was also layered with three types of ribbon.  Puffy paint was applied along the image boarder whereas I inked in the card boarder.   I loved putting this creation together.  It challenged me from the get go and now that I am done I can't wait to color up another one. 

Tail Details: Copic Markers, Stickles & Glossy Accents  

That's it for today!  Thank you for clicking in!

SMILES,
~Nancy

LINKING TO:

Tuesday, March 18, 2014

Handmade Flowers Digi Card Creation


 Hello everyone!  Big SMILES for stopping by! 
  
Every now and then I get the hankering to make something crafty.  Something crafty that isn't what I usually make like a card or mini-book.  When I have this hankering I keep my hands busy by assembling floral embellishments.  Putting together these tiny baubles doesn't take much creative power just concentration and they are perfect for satisfying my need for craftiness.

Hand Assembled Floral Embellishments ~ Inkcicles.com

Each flower embellishment takes approximately three flat flowers.  A fourth flower can be added to make it fluffier.  Prima Marketing, Inc flowers were used to concoct the pink embellies.  Whereas the black/grey ones were from Recollections.  Either brand is easy to use and gives the same effect.  I try to make at least a trio of each color and size that came in the bottle.     

Digi Card ~ Inkcicles.com
 
These kind of floral embellishments can be purchased already assembled but for me I find great satisfaction making them myself.  It feels awesome to get these guys pumped out.  Especially since I have way too many lonely flat flowers that need to be put to use.  Honestly, I don't know what I have more of papers, ribbons, or flowers?  With that being said I better end this post and go make something special with my neglected supplies!

Thanks for checking in on me!

Smiles,
~Nancy

Here's a link to a previous post on the tutorial I used to DIY flowers:  CLICK HERE

LINKING TO:

From Dream to Reality #109
 

Thursday, February 20, 2014

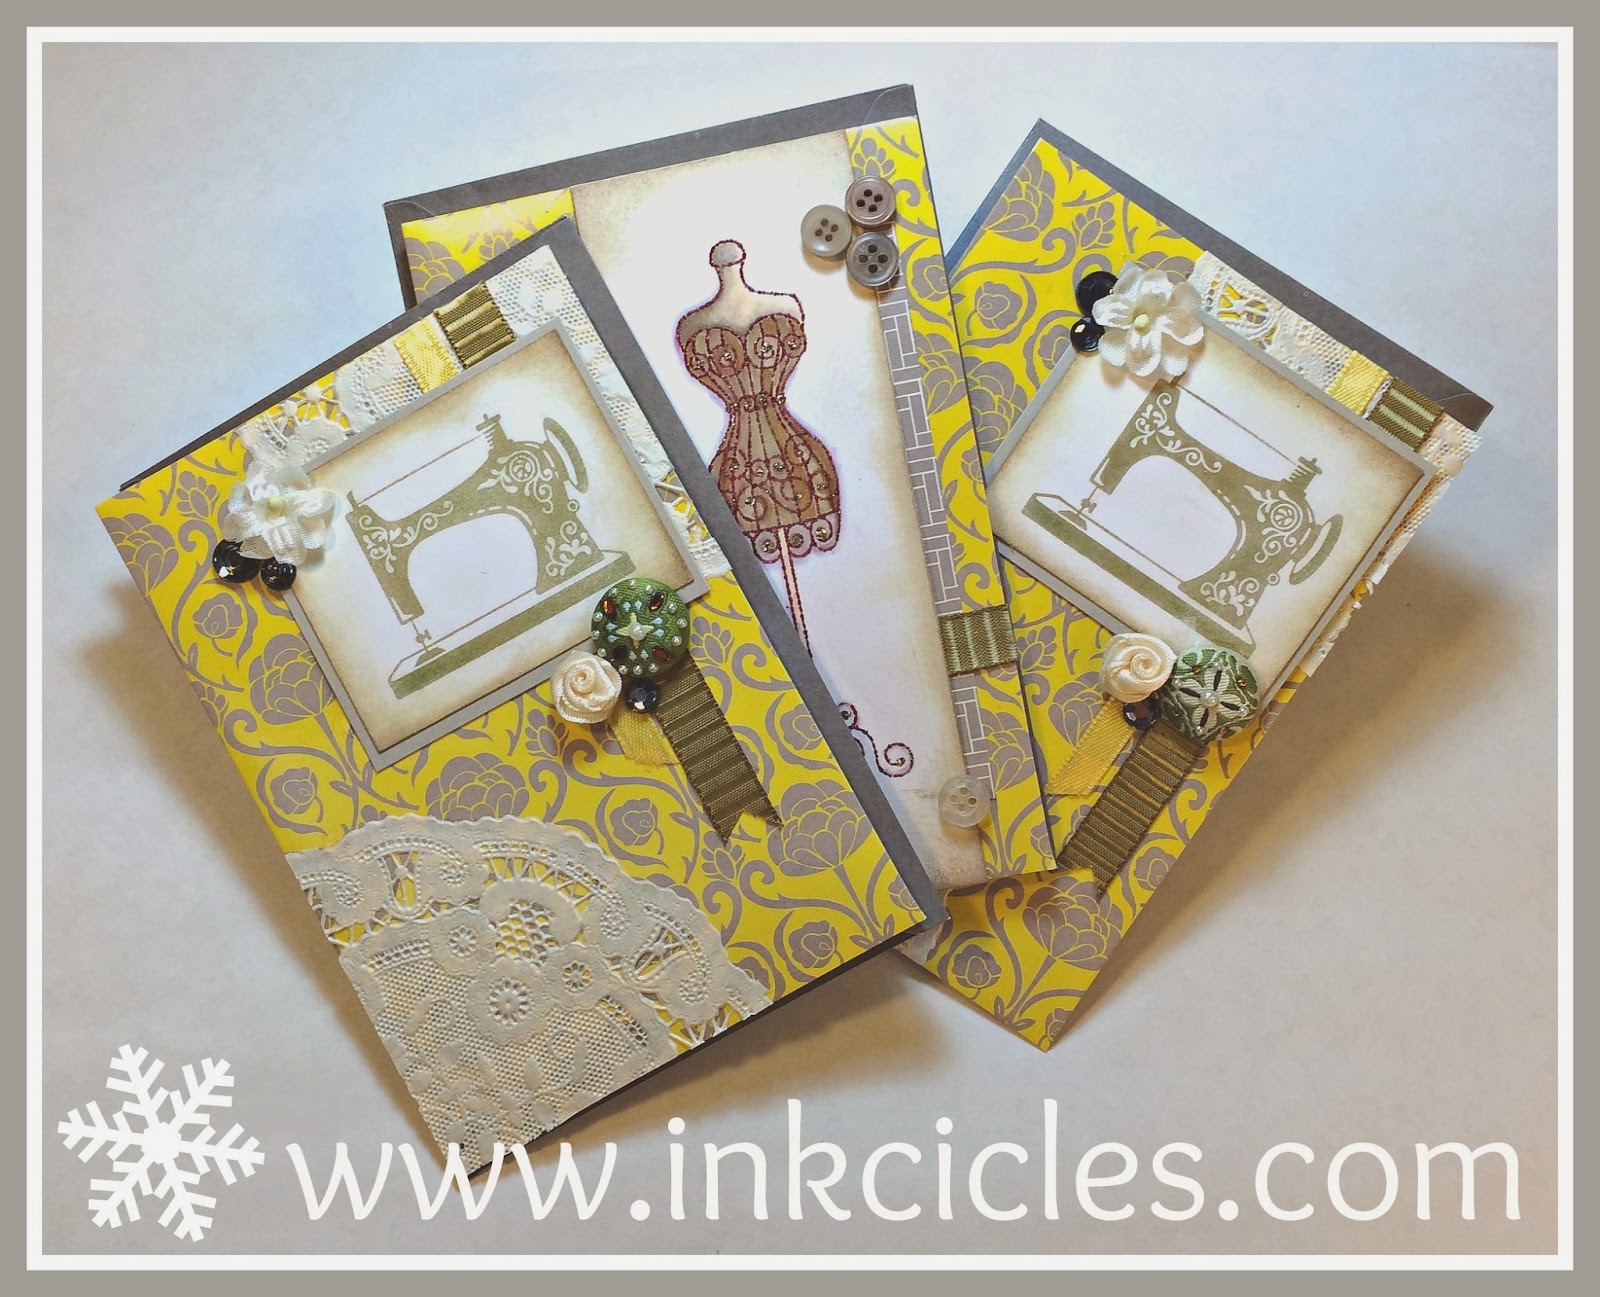
Sew Fun Cards

So did we adventure out yesterday?  Yep, we did go out.  The original plan was to stay snuggled in but we wound up braving the cold to do some unexpected errands.  I have to be honest here...  when you live in the arctic the truth is almost everyday is cold.  Our bodies do acclimate.  Around zero is jacket weather for some.  For me, jacket weather is more like the 20's and 30's.  Now that our temps have dropped down back to the normal seasonal chill, I'm really feeling it down to the bone and don't look forward to going out as much.  Regardless, I hope you are warm and toasty where you are at today!
    
Sew Thoughtful

Who can resist grey and yellow themed creative goodness?  I couldn't.  The blank notecards worked out perfectly with these sewing themed stamps.  Both stamps sets are from Red Rubber Designs:  "Sew Thoughtful" & "Sew Thankful".

Sewing Themed Notecard ~ Inkcicles

I used a modge-podge of old embellies.  I'm ashamed to say that I think all them embellies have been in my stash for years!  I confess.  I'm so bad at using up stuff that I treasure.  My collection would be so much smaller if I'd let myself go and use them up.  I'm discovering that it's simply a waste to not use them up.


Sew Thankful

In the spirit of not wasting things, I'm happy to say that I've already sent out one of these cards.  It feels good to move forward.

Smiles,
~Nancy

Have a GREAT day & THANK YOU for visiting me!

Wednesday, February 19, 2014

Sweet Pea Card

Sweet Pea ~ Special Delivery

Hello!  Happy Wednesday!  It's sunny and bright here in the arctic today.  Bright and sunny often means that our temperatures will drop.  Forecasts put us at temps down 40 degrees below zero (Fahrenheit) this week.  Add the windchill and it's mighty cold.  I'm considering skipping our mail run today and stay nice and cozy inside instead.  How's your weather?  The morning news reported lots of blizzard conditions across the nation.  YIKES!  Where ever you are today, be safe.

These days homeschooling continues on and I find myself not crafting as often.  I'm pretty sure I crafted more when I worked full-time and wasn't home as much.  So today I'm pulling out a card from the archive.  It was made for my best friend's baby shower.

Thank you so much for stopping by blog today!  It was nice to share.

Smiles,
~Nancy

CARD DETAILS:
The papers and stamps were chosen to compliment my friends preferences.  Last time we crafted together she had picked the same papers for a card she was going to gift and I knew how much she liked the designs.

The papers were from DCWV's "Once Upon a Time" mat stack.  The stamps were from my very old stamping collection.  Copics were used to color baby and part of the blanket.  I wound up paper piecing the other part of the blanket and the whole pea pod.  Most paper edges were sponged with VersaMagic pigment inks and let's not forget the doodling on the die cuts and pretty embellies!


LINK PARTIES:


Saturday, December 7, 2013

Family Fun

Not the usual post but I just couldn't help it.  {BIG SMILES}.  Today was the annual craft fair in Barrow.  I look forward to it every year.  It's so fun to seeing everyone, check out the art, and SHOP.
Artist: Sarah Martinsen
This year was our daughter's first time.  She had a blast.  She found so many goodies to ask her Daddy for.  He bought her more than I would.  She figured it out early on to stick with Daddy while shopping.  Maybe I should of stuck close and I would of come home with more too.  Wink-Wink.

Grant Family by Sarah Martinsen
So what did I take home?  I picked up a few little gifts.  All were handmade and that's about all I can say right here.  The one thing I can share is this caricature we had done of all three of us.  I smile every time I look at it.  Ellie sat really still for the sitting.  We were so proud of her.  Maybe someday we will have a more formal portrait done of us.  Local artist, Sarah Martinsen, whipped this up for us.  She is pictured in the top photo with the Santa hat on.  It was cool to meet her.  Her website is in the process of being put together.  Once it's done you'll have to check it out.  Her style is cute and clever.

I hope you are having a great weekend.  I'm glad you stopped.

Smiles,
~Nancy


Wednesday, December 4, 2013

Stamped Cards

Clear Dollar Stamps
I had a hankering to color over the weekend.  When it comes to coloring, I tend to lean towards the more cutesy images and here is what this hankering lead to.  I used Dear Lizzy Lucky Charm designer paper and the same blank notecards.  Mixed in there was Stickles, Prima Flowers, and washi tape.  Coloring was done with Copics.  Inks were Versa Magic, Palatte, and TAC Chalk inks and finally the stamps were from The Angel Company and Clear Dollar Stamps.

The Angel Company

As I am writing this post I realized a very sad thing.  All the cards were made with stamps from a companies that are no longer in business.  :-(   So-so-so sad.  My studio is filled with stamps from companies that don't exist.  Clear Dollar Stamps and The Angel Company are no more.

The Angel Company
Some artist don't keep out of date stamps.  Yes, it is nice to stay current.  Yes, only current supplies are publishable in the magazine community.  Yes, demonstrators need to have current samples for what they sell.  Regardless, I'm keeping mine.

The Angel Company

I purchase or earn stamps because I like them and I keep all my stamps that inspire me to create.   Many sets remind me of special people or events in my life.  They are personal to my style and my heart.  How many times do you buy supplies knowing exactly who you are going to gift your final creation to?  I have a ton of sentiment sets simply for that reason.  It breaks my heart that those companies are no more.

Yikes!  What a realization and here I thought I only had simple cards to share.

Smiles,
~Nancy

LINKING TO:
Pretty Wednesdays with Keren Dukes #15 (FPTFY)
The DIY Dreamer #97 - Party Time

Tuesday, December 3, 2013

Pink Persimmon Cards

Hello!  Today I am sharing these three cards made with Pink Persimmon stamps.  I can't believe that I made these cards over a year ago and I'm just now getting around to posting them.  Life sure did take a detour there for awhile.   

Stamps: Happy Girl


All the images were colored with Copics and paper pieced.  Lots of dies and punches used too.  I also used a combination of Basic Grey and Graphic 45 papers.

Stamps: Mermaid Pearls & Key to My Heart

By the way, Pink Persimmon is having a cyber sale on Wednesday (December 4, 2013) called Pink Wednesday Super Sale.  You can read all about it on their blog:  Get Ready for Pink Wednesday! 


Stamps: Baby Pearls & Carnival Alphabet

So that's it for now.  Short and sweet.

Smiles,
~Nancy  

Linking to:

The DIY Dreamer


Pretty Wednesday Linky Party #15
Free Pretty Things for You

THANK YOU FOR CLICKING IN AND CHECKING MY CARDS OUT!

Wednesday, November 27, 2013

Naked Simple Notecard


Oh my!  It's a naked notecard!  Not quite naked but almost.  What do I mean?  Instead of using my blank as a card matte and all covered up, here it's the actual card with one little layer.  The owl was stamped on white card stock and cut out with a Spellbinders die.  Coloring was done with all Copic markers.  Red ink was used to distress the edges of the die cut along with doodling as a boarder.  I wasn't sure if I would like the doodling.  I was afraid that I would mess it up.  In the end it came out just right.  

"Who Loves Ya Baby?" Card
What do you think?

Smiles,
~Nancy

LINKING TO:


Pretty Wednesdays with Keren Dukes (FPTFY)
LINK PARTY #14

Tuesday, November 26, 2013

Notecard Stamping

Howdy!  Once upon a time a crazy crafter found these awesome multi-colored notecards in a clearance bin.  She simply couldn't resist the bold inspiring colors and sleek design.  Fifty cents for a stash of eight.  The crazy crafter felt awesome knowing that she could put these cards to good use.

With the magic of Stazon ink and Red Rubber Designs "Blossoms & Blessings" rubber stamps, the Crazy Crafter changed those sleek notecards into Thanksgiving cards.

The End.


I hope you liked my silly story.  It's all true.  Every bit of it.  Ha-ha...  I think homeschooling a first grade girlie has had an influence on my writing style today!

Anyhow, these fun cards were made with colorful blank notecards.  Generally all my cards start out with a blank white notecard.  Blank whities are a must in my supply stash. I love how they can be used as the card base and that they come with matching envelopes.  Time and money savings all in one.

Thanks for visiting me today. Did you make any Thanksgiving cards this season?

Smiles,
~Nancy

Saturday, November 23, 2013

Update: Little One

Hello!  It's been a long few day.  Did I say long?  Yep, her fever, sore throat, plus more persisted.  I took her into the clinic.  Little One has strep.  :-(

Waiting to be seen at the clinic.  Reading to Momma.
She's been on antibiotic therapy since yesterday.  Twenty-four hours in and we are making progress!  Praise God!  Fever free for half a day now.  I am hoping that it doesn't return over night.  I can't tell you how relieved I am that she is doing better.  :-)

My friend Tammy of Handmade by TLC asked if she liked her card.  (See previous post.)  The answer is YES.  It was so precious.  She ran her finger across the flower petals and told me that she like the way I colored the little girl.  She also said that it's her favorite card and she's going to keep it forever.   For me, I rarely get to see someone receive one of my handmade cards.  She went from slumped feeling terrible to a few moments of beaming smiles.  I earned a hug.  It was totally worth it!

Reading her card on the way back from the post office.
No school while she's been super sick.  We are now officially two days behind on our homeschooling.  It'll be interesting to see how this effects the schedule for the rest of the year.  I'd really like to be done by the time school is out here in the village.  It's a blessing having the flexibility with our school work.  I can't wait to have our first year under our belts but I'll settle for her being well most of all.

Smiles,
~Nancy


Thursday, November 21, 2013

It's a CARD!

Hello HAPPY!  It's Thursday and my Little One has a fever.  Her being sick doesn't make me happy but this card does.  I designed it over the summer and it has been hanging out in my stash every since.  Today is the perfect day to put a note in it and give it to my Little One.  Now that she's in first grade she can actually read what I write in it which makes it even sweeter.

The card itself is bright and whimsical.  The stamped image was colored with Copics.  Originally the image was much bigger.  She was sitting on a bench.   Due to a huge boo-boo on my part, I had to cut it out and leave it off.  Now she's comfortably perched on a blossom.

Well, I better get back to being "mommy" and check on my Little One.
Hope she likes her card.

Smiles,
~Nancy


Monday, November 18, 2013

Quick Little Update...

Playing out.

Hey there!  Guess what I've been up to?  With much prayer and God's leading, my husband and I have embarked on another journey of faith.  I officially resigned from my job and have become a full time homemaker and teacher!  That's right I am homeschooling.

Crazy for snow!

The transition from the workplace and being a career minded woman to full-time wife/mother/teacher has been pretty smooth.   Giving up half our income was more of a leap of faith.  Being a mom and wife never changed but becoming solely responsible for our daughter's complete education is huge.  I am thankful that Alaska is a pro-homeschooling state and that I have lots of at-home-education experienced friends here in town.  It is a an adjustment that we are still living through.  The blessing is seeing our daughter excel in her school work and grow her love for God.  She is a witness to me and her Daddy.  It is something to see life lessons through her eyes.

My Happy 1st Grader

So there you have it... a quick little update.

SMILES!


Saturday, September 1, 2012

Design House Digital and Me


I am coming down from Design House Digital's Dollar Days just in time to discover that they are doing a free blog series on design!  It's called "School of Design".   Everyday in September they will post information that will inspire you to create.  
Easter 2012 FBC Salinas, CA - Design House Digital Products


Just reading the topics excite me!  SO COOL!!!!
  • Mondays: The Theory of Color – Arielle Gordon
  • TuesdaysMaking Templates Your Own – Crystal Livesay
  • Wednesdays: Creative Clustering – Mye De Leon
  • Thursdays: Grammar Girl’s Guide to Great Journaling – Audrey Neal
  • Fridays:  Inspiration Everywhere – Mary Rogers
  • Saturdays: Brushes 101 – Jen Flaherty
  • Sundays: Photography: Tips & Tricks – Jennifer Valencia


I am a novice when it comes to digital design.  For the most part I use Pages to put my pages together.  PhotoShop is too overwhelming with all the options.  Maybe someday I'll sit down and figure it out.    

Here's a project I made this week with Design House Digital products.  It's a photo cluster that I am going to print out and put on a paper page.  I think I'll print it out twice so that I can pop it up to add some layers.  

Thank you for visiting me today!  See you at Design House Digital's School of Design!


Smiles,
~Nancy


Pin It

BARROW AGAIN!!!!


Yes, I haven't blogged for the majority of this year.  Guess what happened?!  We moved back to the arctic!!!!  That's right!!!  We are finally home.  I thank God for our time in Oregon and I thank Him even more for bringing us back to Alaska.


I really struggled with deciding whether or not I should bring my studio up with us.  A room full of crafty goodness is very expensive to move from the Lower 48 to very top of world.  I was ready to put paper crafting on hold and try my hand at digital designing only.  My husband was shocked that I would consider leaving my craft supplies behind.  When it came down to it he advised me against going all digi and to bite the bullet and ship everything up.  BIG SMILES.


It's been wonderful to back.  We are almost settled all the way in.  The only thing left to unpack and organize is my studio.  Yep, everything had to come first and now I am at the point that I just have to create again!  I don't know how I've lasted so long without cutting paper, adhering bling, and making flowers.


Now that we are back in Barrow, my husband and I both have new jobs.  I am back to working full time again.  Our daughter started kindergarden and we are reunited with our grown son who lives in here too.  We are also back in our home church.  I just about cried every church service for the first few weeks.  I feel so blessed.... blessed beyond measure.

Now that I am looking back over our summer I've discovered that I hardly took any pictures during our transition.  I think you would of been impressed with the mountains of totes it took to get us moved.  Anyhow, here's a glimpse of me and Ellie on our way back to Barrow.  Our longest flight was just under four hours.  From beginning to end it took us 13 hours of travel time and two plane changes to get home.  Towards the end Ellie was done being in her seat.  I cringed when she insisted on making herself comfortable on floor to play.  I guess if I were that little I would want all the space to play too.  Thankfully she is a good traveler and loves the adventure.  We are two peas in pod when it comes to traveling.


So there you have it... we are finally HOME!  Barrow, Alaska

Picture from: Nomadic Birder
Barrow, Alaska Blog Post


Pin It

Thursday, May 17, 2012

Privacy Screen & My Handyman

My handyman and our project.

Yep, it's me... Miss Neglectful Blogger.  Lots of life stuff happenin' here.  Nothing bad.  Just busy.  I've been blessed with a temporary job that requires me to travel.  While I am gone I don't have reliable internet access.  So here I am months later with a post.

Peek-a-boo!!!  Can you see our neighbors?

We are in the midst of selling our home.  It's a wonderful four bedroom three full bath blessing.  I'd love to take it with us when we finally head back to Alaska.  Since that's not feasible our home is for sale.  As one of our property improvements we've installed a "privacy screen" in our front yard.  We went with a screen to block the view into the duplex next door and to keep the rest of the view of the valley open.


The concept of a privacy screen didn't really click with my husband until I pulled up a few designs from the web.  We were set with an awesome design and about to buy our supplies when I came across this one.  This concept was way more simple and cost effective.  We spent a total of $400's on this project which was a great deal for the end product.  We were diligent to take the time to shop around for supplies.  We actually more than doubled our screen for the same price as what as estimated for just two sections.

She handed Daddy the lights.  She was so proud to help.

I loved the whole process.  This was one of the few home improvement projects that me and my husband have started and finished together.  It was cool.  We found the designs together, shopped together, and assembled together.  Really I just did the sewing with the canvas and helped string them together.  What a bonding experience.  This was a several day process to make.  One day to dig the holes and pour cement for the metal post holders.  Another day for the stain to dry.  Posts and lights up another and then finally my part with the canvas.


Looking good!

Anyhow, the privacy screen is wonderful!  It blends in well with our landscape and makes the yard look much better.  At night the solar lights shine and every time I see them on I smile.

Smiles,
~Nancy

PROJECT LINK:
Lowe's Wind/Privacy Screen

Pin It